Today, I came across a post by Michael J. Swart on LinkedIn in which he presented a variation – based on his blog article „Partitioning a Huge Table Quickly“ – of how to implement partitioning with minimal impact on application performance. I was impressed by the solution, as I hadn’t realized it was possible to create a partition function without boundaries. Excellent as the article is, Michael always assumed that a clustered index already existed on the table to be partitioned, with the – future – partition key as its first attribute. This scenario is rare. I remembered how I solved the problem with roughly two seconds of downtime. This blog post describes the solution approach in detail.
Scenario
Although the dbo.orders table contains 30,000,000 records and is not partitioned, the customer tables hold more than 50 billion rows, which further increases the complexity of the scenario. In this system, [o_orderkey] serves as the clustered primary key, with the application producing each new value on insert. During our first implementation of this strategy, the client’s requirements were clear.:
- There was to be no or very short (less than 1 Minute) downtimes
- The application had to remain operational throughout the partitioning process.
- No additional storage if possible!
The IT manager accepted some performance degradation. He understood the process would affect the application.
Solution by Michael J. Swart and Impact
Michael’s solution assumes the primary key already includes the partition key, yet this design is uncommon in real systems and often requires additional restructuring.
- A partition function and a partition scheme are created.
- An identical table – such as dbo.orders_temp – is created, and because neither table is partitioned at this stage, both operate entirely within PARTITION 1.
- A SWITCH() operation is used to transfer the data from the original table to the newly created table (a metadata operation).
- Once the original table is empty, its clustered index is rebuilt on the partition scheme so the structure aligns with the new partitioning model.
- Finally, the data from the temporary table is assigned back to the original table using a SWITCH() command.
The main advantage is the rapid creation of a partitioned clustered index without rebuilding the table. The issue with this solution is that the SPLIT() operation is a metadata operation; on a table containing existing data, the SPLIT operation takes a very long time – depending on the volume of data – and a SCH_M lock is placed on the partitions during the process. Despite its elegance, the approach was not usable for our client.
Our solution with nearby ZERO downtime
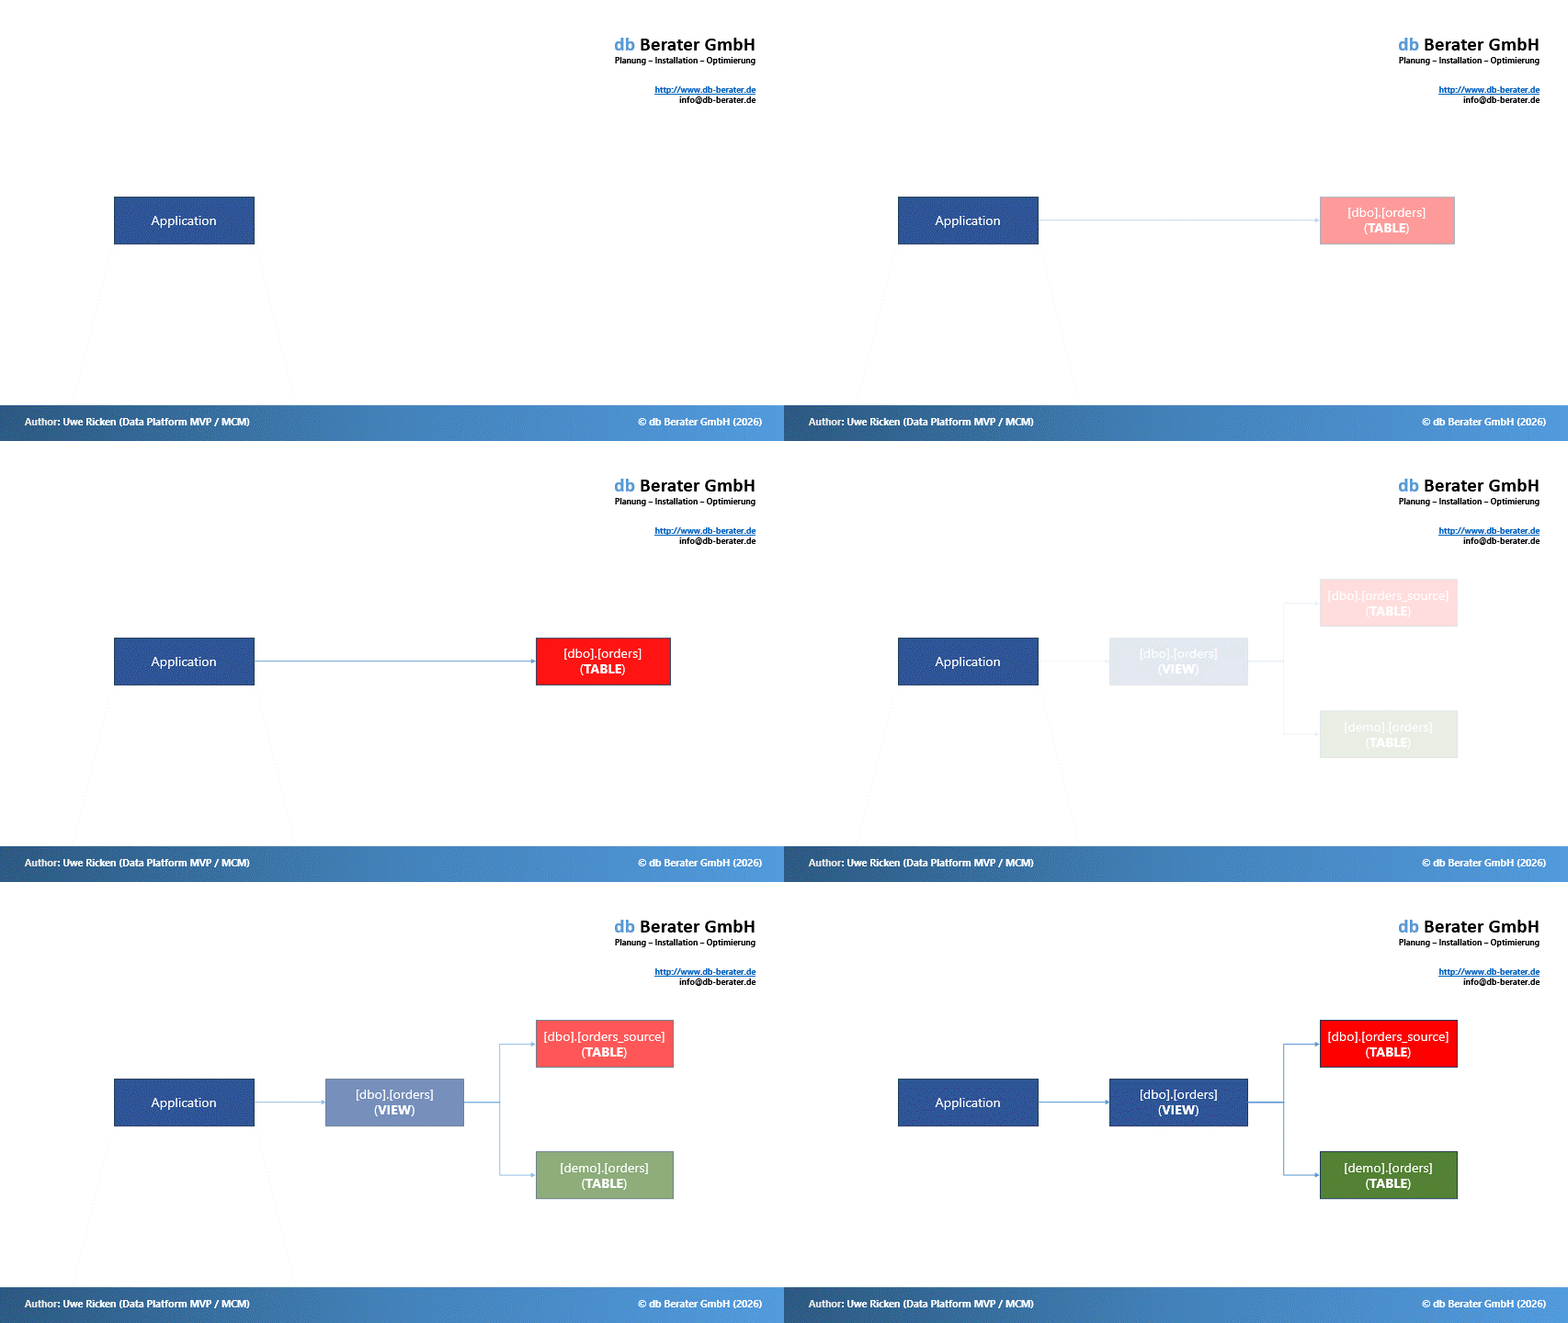
We resolved the issue with additional effort, yet we still achieved minimal downtime because the process was carefully orchestrated. Please note that the system did NOT have a clustered index that included the future partition key! The individual steps we had to take:
- A partition function and partition scheme must be created so the new table can distribute data across the defined boundaries.
- Create a new table: [demo].[orders]
- Rename the original table [dbo].[orders] to [dbo].[orders_source]
- Create a view named [dbo].[orders] to allow the application to access the object
The view includes both [demo].[orders] and [dbo].[orders_source] so the application can continue reading from a unified structure while data is being moved. - Create a trigger on the [dbo].[orders] view for IUD (Insert, Update, Delete) operations
- Create a stored procedure to delete data from [dbo].[orders_source] based on a specified time range
- PowerShell script for the parallel execution of the stored procedure using different time ranges
Creation of partition function and partition scheme
/*
	Let's create the partition function on a yearly interval
*/
CREATE PARTITION FUNCTION pf_o_orderdate (DATE)
AS RANGE RIGHT FOR VALUES
(
	'2013', '2014', '2015', '2016', '2017', '2018', '2019', '2020',
	'2021', '2022', '2023', '2024', '2025'
);
GO

CREATE PARTITION SCHEME ps_o_orderdate
AS PARTITION pf_o_orderdate
ALL TO ([PRIMARY]);
GO
The partition function is based on full years. My demo table contains data from 2013 to 2025. Therefore, I need a partition for each year. In case you are wondering why the partition function doesn’t use a full date, here is a quick tip: If you use a date data type as the partition parameter and always partition by full years, specifying just the year is sufficient. Microsoft SQL Server automatically converts the year so that the date is always January 1st of that year.
A quick note: For the demo, the partition scheme uses only the [PRIMARY] filegroup. For our client, however, we created a separate filegroup with corresponding data files for each partition. There were several reasons for this:
Better distribution of the write load during data transfer
Improved management when deleting partitions, without leaving empty space in the database.
Creation of the new table [demo].[orders]
Creating the table that will store the transferred data is quick, although ensuring it aligns with the partition scheme requires careful attention.
CREATE TABLE demo.orders
(
	o_orderdate		DATE	NOT NULL,
	o_orderkey		BIGINT	NOT NULL,
	o_custkey		BIGINT	NOT NULL,
	o_orderpriority	CHAR(15)	NULL,
	o_shippriority	INT			NULL,
	o_clerk			CHAR(15)	NULL,
	o_orderstatus	CHAR(1)		NULL,
	o_totalprice	MONEY		NULL,
	o_comment		VARCHAR(79)	NULL,
	o_storekey		BIGINT		NOT NULL,

	CONSTRAINT PK_demo_orders PRIMARY KEY CLUSTERED
	(
		o_orderdate,
		o_orderkey
	)
	WITH
	(
		DATA_COMPRESSION = PAGE
	)
)
ON ps_o_orderdate (o_orderdate);
GO

/* Prevent Lock Escalation on Table Level but only HOBt-Level */
ALTER TABLE demo.orders SET (LOCK_ESCALATION = AUTO);
GO
- The table’s primary key consists of both the partition key and the original primary key, which ensures that data is correctly routed into the appropriate partitions.
- The table is created on the partition scheme [ps_orderdate].
- Prevention of LOCK ESCALATION (we can fill multiple partitions at the same time!)
Rename the original table
Renaming objects is the most difficult step because it requires exclusive access to the table, and any active connection immediately blocks the operation. At the same time, there is the issue that the application crashes with errors after the renaming because it cannot locate the object. For this reason, a brief downtime of approximately 2 seconds was required for the next three steps.
BEGIN TRANSACTION
    /* rename the original table */
	EXEC sp_rename @objname = N'dbo.orders', @newname = N'orders_source', @objtype = N'OBJECT';
	GO

    /* create a view with the name of the original table which covers the data from both tables */
	CREATE OR ALTER VIEW dbo.orders
	AS
		SELECT	*
		FROM	dbo.orders_source

		UNION ALL

		SELECT	*
		FROM	demo.orders;
	GO
COMMIT TRANSACTION
GO
The next step requires an explanation of the limitations associated with views that contain a UNION ALL. However, the basic concept is already clear: we revoke the application’s access to the original table and present it via a view bearing the original table’s name. At the same time, we must make the data already transferred from [demo].[orders] available to the application. Hence the idea of using a view that combines both data pools. Such a view cannot store new data or update or delete existing rows, which forces the use of an INSTEAD OF trigger to handle write operation.
INSTEAD_OF-Trigger for [dbo].[orders] (VIEW)
CREATE OR ALTER TRIGGER trg_orders_ins_upd_del
ON dbo.orders
INSTEAD OF
	INSERT,
	UPDATE,
	DELETE
AS
BEGIN
	SET NOCOUNT ON;
	SET XACT_ABORT ON;

	/*
		An INSERT does not have rows in deleted
		An UPDATE does have rows in inserted and deleted
		An DELETE does have rows in inserted
	*/

	/* Covering INSERT */
	IF NOT EXISTS (SELECT * FROM deleted)
	BEGIN
        /* Write new data into the partitioned table */
		INSERT INTO demo.orders
		SELECT * FROM inserted;
	END

	/* Covering DELETE */
	IF NOT EXISTS (SELECT * FROM inserted)
	BEGIN
        /* Delete data from old and new table */
		DELETE	os
		FROM	dbo.orders_source AS os
				INNER JOIN deleted AS d
				ON (os.o_orderkey = d.o_orderkey)

		DELETE	os
		FROM	demo.orders AS os
				INNER JOIN deleted AS d
				ON (os.o_orderkey = d.o_orderkey)
	END

	/* Otherwise it must be an UPDATE */
	BEGIN
		WITH s
		AS
		(
			SELECT * FROM Inserted
			EXCEPT
			SELECT * FROM Deleted
		)
		MERGE dbo.orders_source WITH (HOLDLOCK) AS os
		USING s ON (os.o_orderkey = s.o_orderkey)
		WHEN MATCHED THEN
			UPDATE
			SET	os.o_orderdate = s.o_orderdate,
				os.o_custkey = s.o_custkey,
				os.o_orderpriority = s.o_orderpriority;
				/* and all other columns */

		/* Same with new table but shortend for this blog post! */
END
GO
Now that the infrastructure has been prepared, the stored procedure can be created to transfer data from the [dbo].[orders_source] table to the target partitioned table, [demo].[orders]. The great thing is that the procedure can be executed by multiple processes simultaneously, allowing different time periods to be transferred.
Stored Procedure [dbo].[move_data]
CREATE OR ALTER PROC dbo.move_data
	@start_date		DATE,
	@finish_date	DATE
AS
BEGIN
	SET NOCOUNT ON;
	SET XACT_ABORT ON;

	DECLARE	@rc INT = 1;

	WHILE @rc > 0
	BEGIN
		DELETE	TOP (3000)
				dbo.orders_source

		OUTPUT	deleted.*
		INTO	demo.orders

		WHERE	o_orderdate >= @start_date
				AND o_orderdate <= @finish_date;

		SET	@rc = @@ROWCOUNT;
	END
END
GO
For the purposes of this blog post, the stored procedure has been kept very simple, yet the key process step is clearly evident.
- Only small batches of data are deleted at a time so lock escalation on the original table is avoided and concurrent processes can continue running.
- Deleted records are moved to [demo].[orders] while the original table gradually empties, ensuring a smooth and controlled migration.
- The loop continues executing until no further records are found, and only then does the process advance to the next time range.
Final step(s)
- Once the data from the source table has been fully transferred to the new table, two further steps are required to complete the process:
- Deleting the view
- Renaming the new table
- Deleting the previously renamed table
/* Drop the existing view [dbo].[orders] */
DROP VIEW IF EXISTS dbo.orders;

/* Move [demo].[orders] into the schema [dbo] */
ALTER SCHEMA dbo TRANSFER demo.orders;

/* Drop the EMPTY source table [dbo].[orders_source] */
DROP TABLE IF EXISTS dbo.orders_source;
Lessons learned from our project
Converting a non-partitioned table into a partitioned table requires a clear process. Anyone developing such a solution acts as architect, DBA, and developer all at once. Before implementing such a solution, it is essential to understand the table’s dependencies on other objects:
- Does the table have a referential dependency on other tables?
- Does the table have triggers?
- Is the table a heap?
- Does the table have additional non-clustered indexes?
Foreign Key Dependencies
If the table itself is the master table in a foreign key relationship, the goal of partitioning it becomes more complex or even impossible. This is because the clustered primary key must include the partitioning key, which in turn must also be present in the detail table if a referential relationship is involved.
Triggers – the silent breaker
If the table to be partitioned has triggers, they must be thoroughly examined beforehand. Triggers can alter the workload and may reference the table directly. This can lead to errors and potentially result in a complete failure of the application, the data, and data integrity.
Heaps – minimal chances without additional memory
The deletion process I outlined naturally works for heaps as well. However, things become difficult if the requirement is to implement partitioning while minimizing additional storage usage. The solution I demonstrated deletes records from the original table in small batches to prevent lock escalation. Heaps complicate the process. Without a TABLOCK hint, they do not deallocate freed space during deletion unless rebuilt.. Consequently, more storage is required to manage both the freed space and the data in the new table. That would have been an impossible task in the scenario I described!
Additional nonclustered indexes
Non‑clustered indexes must also be recreated on the target table because they preserve query performance and maintain the expected access paths. It is advisable to create these indexes at the same time the table itself is created. As a rule, the indexes should NOT be created on the partition scheme, as doing so alters the index’s behavior. Simply converting a table into a partitioned table therefore changes nothing regarding subsequent maintenance. Wherever possible, one should attempt to implement all non-clustered indexes as „aligned“ indexes after analyzing the workloads. However, this may prove to be an impossible task unless the application is designed to accommodate it!
Additional important settings
Ensure the new table has LOCK_ESCALATION set to AUTO so table‑level locks are prevented and only partition‑level locks occur during data movement. This setting gives you the possibility to move the data in multiple processes (we took 10 parallel processes to move the last 10 years) without blocking any process.
I always recommend using separate filegroups and database files because they simplify database size management and make partition maintenance far more efficient. When you move out a full year (e.g. 5 bln rows) you only have to TRUNCATE the underlying partition, remove the database file and the filegroup. No additonal growth of the database file on [PRIMARY]!
Always try to use aligned indexes. I know it is sometimes not possible but if the application can handle it or queries could be rewritten easily, force the customer to do that. That will make your maintenance of the big table so easy!
Thank you for reading!